Achieving a brighter, whiter smile can significantly boost your confidence and overall appearance. Zoom at-home whitening offers a convenient and effective way to enhance your smile from the comfort of your own home. This comprehensive guide will walk you through the entire process, from understanding the basics to maintaining your dazzling results. Whether you’re new to teeth whitening or looking for a refresher, this guide provides all the necessary information to safely and effectively use the Zoom at-home whitening system. With proper guidance, you can achieve a noticeably whiter smile and enjoy the benefits of a more confident you. Let’s dive into the world of Zoom at-home whitening and discover how easy it can be to transform your smile.
Understanding Zoom At-Home Whitening
Zoom at-home whitening is a professional-grade teeth whitening system designed for use in your own home. It utilizes a custom-fitted tray and a potent whitening gel to gently lift stains and discoloration from your teeth. This method is a popular choice because of its convenience and effectiveness. Unlike over-the-counter products, Zoom at-home whitening is typically prescribed and monitored by a dentist, ensuring a safe and personalized approach. The system allows you to achieve professional results at your own pace, making it a convenient option for those with busy schedules. This approach ensures the whitening process is tailored to your specific needs and provides the best possible outcome.
What is Zoom At-Home Whitening?
Zoom at-home whitening typically includes custom-fitted trays made from impressions of your teeth, a professional-strength whitening gel containing a bleaching agent (usually hydrogen peroxide or carbamide peroxide), and detailed instructions from your dentist. The custom trays ensure the whitening gel evenly contacts your teeth, maximizing effectiveness and minimizing gum irritation. The concentration of the whitening agent is higher than what you’d find in over-the-counter products, leading to faster and more dramatic results. Your dentist will assess your oral health and create a personalized treatment plan, taking into account the sensitivity of your teeth and the level of whitening you desire. This professional oversight is a key advantage of the Zoom at-home system.
Benefits of At-Home Whitening

The benefits of Zoom at-home whitening are numerous. Firstly, it offers a significant improvement in the brightness of your smile, often several shades whiter. Secondly, the custom-fitted trays ensure even whitening across all visible teeth, leading to a more consistent and natural-looking result. Thirdly, at-home whitening provides flexibility and convenience, allowing you to whiten your teeth at a time that suits your schedule. The process is generally considered safe when used under the guidance of a dental professional, minimizing the risk of complications. Furthermore, the boost in confidence that comes with a brighter smile is often cited as a major benefit. The ability to enhance your smile from the comfort of your home is a significant advantage for many users.
Getting Started with Zoom At-Home Whitening
Before starting the Zoom at-home whitening process, it’s essential to consult with your dentist. They will examine your teeth to ensure you’re a suitable candidate and check for any underlying dental issues that might need addressing. Your dentist will take impressions of your teeth to create the custom-fitted whitening trays. Once you receive your trays and whitening gel, your dentist will provide detailed instructions on how to use the system. This may include the duration of each whitening session, the frequency of treatments, and any specific precautions. Following these instructions carefully is critical to achieving the best results and avoiding potential side effects. Make sure you fully understand the process and are comfortable with the steps before proceeding.
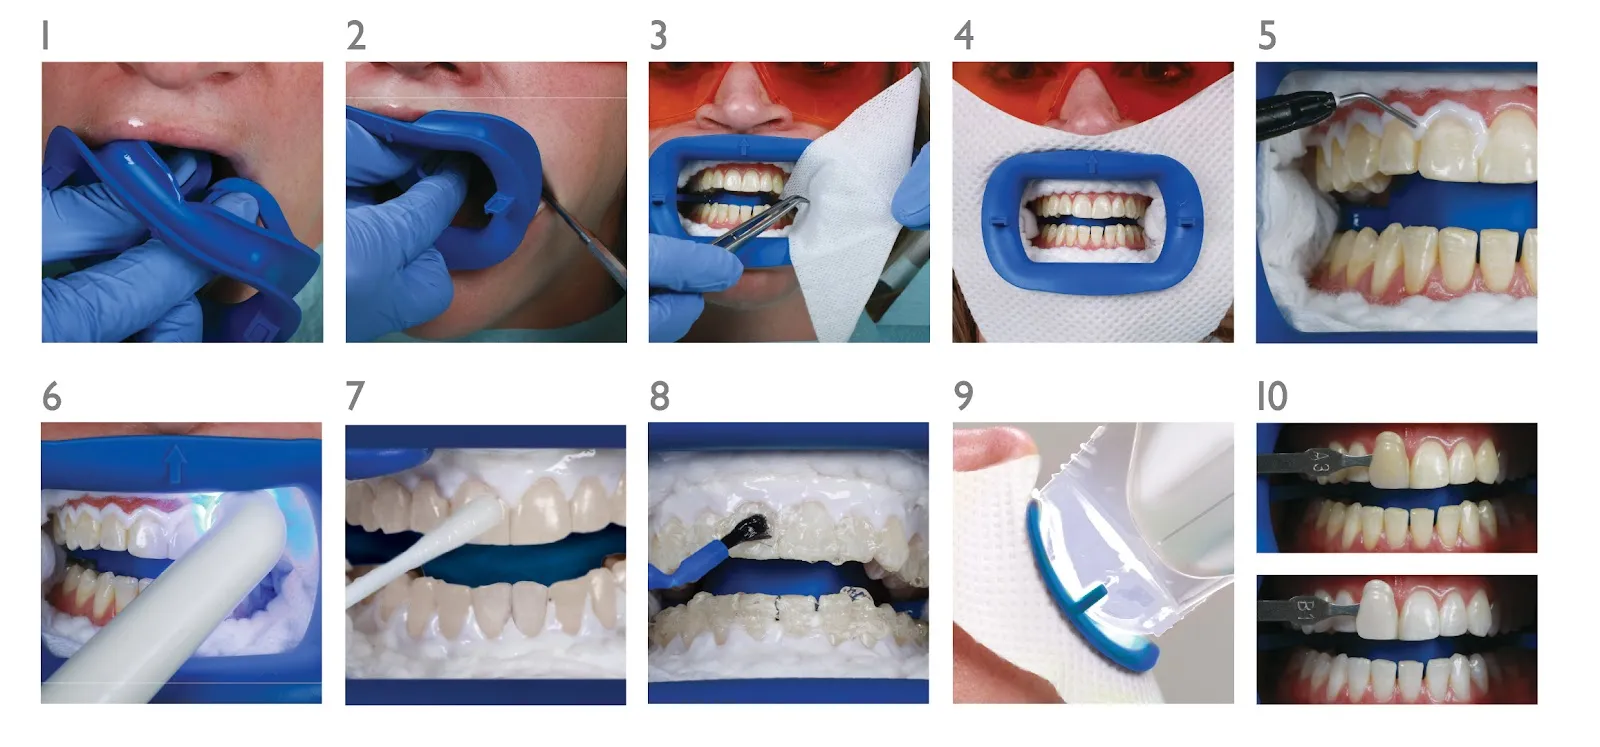
Step 1 Preparing Your Teeth
Before applying the whitening gel, brush and floss your teeth thoroughly to remove any plaque or food particles. This step ensures the whitening gel can effectively contact your teeth. Use a soft-bristled toothbrush and a toothpaste designed for sensitive teeth if you experience any sensitivity. Rinse your mouth with water to remove any remaining toothpaste residue. Make sure your teeth are completely dry before applying the gel. This step helps maximize the effectiveness of the whitening process and minimizes the risk of the gel being diluted by saliva. Ensuring your teeth are clean and dry is a crucial first step.
Step 2 Applying the Whitening Gel

Using the syringe provided in your Zoom at-home whitening kit, carefully apply a small amount of the whitening gel into each tooth impression of your custom tray. Avoid overfilling the tray, as this can lead to gel leakage and potential gum irritation. The amount of gel required will vary depending on the size of your teeth and the specific instructions provided by your dentist. Ensure the gel is evenly distributed within the tray to ensure uniform whitening. The gel is generally applied to the front surfaces of the teeth that are visible when you smile. Handle the syringe carefully to avoid spills and ensure you are dispensing the correct amount of gel.
Step 3 Using the Whitening Trays
Once the gel is applied, carefully insert the whitening trays into your mouth, ensuring they fit snugly against your teeth. Gently seat the trays, making sure the gel covers the front surfaces of your teeth. Follow the time recommendations provided by your dentist, typically ranging from 30 minutes to several hours per session. Avoid eating or drinking anything other than water during the whitening session. Once the recommended time is up, remove the trays and rinse your mouth thoroughly with water to remove any remaining gel. Clean the trays with cool water and a soft toothbrush to remove any gel residue before storing them. Regular and consistent use, according to your dentist’s instructions, is key for optimal results.
Step 4 The Whitening Process
The whitening process involves the bleaching agent in the gel breaking down stain molecules within the enamel of your teeth. As the gel interacts with your teeth, it lifts discoloration caused by factors such as coffee, tea, red wine, and tobacco. The duration of the whitening process varies depending on the severity of the stains and your desired level of whiteness. Most users see noticeable results within a few days to a few weeks of consistent use. Your dentist will monitor your progress and adjust the treatment plan if necessary. It is important to be patient and consistent with the treatment plan provided by your dentist to achieve the desired results. Remember that individual results can vary.
How Long to Whiten?

The duration of the whitening process depends on several factors, including the initial shade of your teeth, the severity of the stains, and the concentration of the whitening gel. Your dentist will provide a personalized treatment plan based on your individual needs. Some people may see results in as little as a week, while others may require several weeks of treatment. It is crucial to follow the instructions provided by your dentist and avoid exceeding the recommended treatment time. Over-whitening can lead to tooth sensitivity or gum irritation. Regular check-ups with your dentist will allow them to monitor your progress and make any necessary adjustments to your treatment plan, ensuring the best and safest possible results.
What to Expect During Whitening
During the Zoom at-home whitening process, you may experience some temporary side effects. Tooth sensitivity is a common side effect, which can range from mild to moderate. Gum irritation may also occur if the whitening gel comes into contact with your gums. Your dentist may recommend using a toothpaste for sensitive teeth to manage this sensitivity. Avoid excessive consumption of staining foods and drinks during treatment. Any discomfort should subside shortly after you finish the whitening treatment. If you experience any significant discomfort or persistent side effects, contact your dentist immediately. They can provide advice and adjust the treatment plan if necessary, ensuring your comfort and safety.
Step 5 Maintaining Your White Smile
After completing the Zoom at-home whitening treatment, it’s essential to maintain your new, brighter smile. Regular dental check-ups and cleanings are crucial for preventing stains and maintaining overall oral health. Practice good oral hygiene by brushing your teeth twice daily with fluoride toothpaste and flossing daily. You can also use a whitening toothpaste to help maintain the brightness of your smile. Consider using a straw when drinking staining beverages to minimize contact with your teeth. Avoid smoking and reduce your consumption of staining foods and drinks. Regular maintenance can help prolong the results of your whitening treatment and keep your smile looking its best for years to come.
Tips for a Whiter Smile After Whitening

Several lifestyle choices can help you maintain a whiter smile after whitening. Reduce or eliminate your intake of staining foods and drinks, such as coffee, tea, red wine, and dark-colored sodas. If you consume these items, rinse your mouth with water immediately afterward or brush your teeth. Avoid smoking or using tobacco products, as these can quickly stain your teeth. Consider using a whitening toothpaste or mouthwash to help maintain your results. Schedule regular dental check-ups and cleanings to remove surface stains and keep your teeth healthy. By adopting these habits, you can significantly prolong the effects of your whitening treatment and enjoy a bright and confident smile for a long time.
Avoiding Staining Foods and Drinks
Certain foods and drinks are notorious for staining teeth and can quickly diminish the results of your whitening treatment. These include coffee, tea, red wine, dark-colored sodas, berries (such as blueberries and strawberries), soy sauce, and curries. To minimize staining, consider limiting your consumption of these items or rinsing your mouth with water immediately after consuming them. Using a straw when drinking beverages can also help to reduce contact with your teeth. If you enjoy these foods and drinks, make sure to brush your teeth regularly and maintain good oral hygiene to help prevent staining. Being mindful of your dietary choices can significantly help you preserve your newly whitened smile.
Troubleshooting Common Issues
Occasionally, you may encounter some common issues during the Zoom at-home whitening process. These may include tooth sensitivity, gum irritation, and uneven whitening. In most cases, these issues are temporary and can be managed with simple strategies. Tooth sensitivity can be alleviated by using toothpaste designed for sensitive teeth and avoiding extremely hot or cold foods and drinks. Gum irritation can be minimized by ensuring the whitening gel does not come into contact with your gums. If you experience uneven whitening, consult your dentist, as they may be able to provide solutions. Always communicate any concerns with your dentist, and they can adjust the treatment plan as needed to address any issues that arise.
Sensitivity

Tooth sensitivity is a common side effect of teeth whitening. It occurs because the whitening gel can penetrate the enamel and reach the dentin, which contains nerve endings. To manage sensitivity, use a toothpaste specifically formulated for sensitive teeth. Avoid extremely hot or cold foods and drinks. You may also consider taking over-the-counter pain relievers, as recommended by your dentist. If sensitivity persists or becomes severe, consult your dentist, as they may be able to adjust your treatment plan or recommend desensitizing agents. Sensitivity generally diminishes within a few days after you stop the whitening treatment.
Uneven Whitening
Uneven whitening can occur if the whitening gel does not reach all areas of your teeth or if some teeth have more intrinsic stains than others. Ensure the trays fit snugly and that the gel is applied evenly. If you notice unevenness, contact your dentist for advice. They may recommend additional whitening sessions or a different approach. Some teeth may naturally whiten more slowly than others. In some cases, intrinsic stains, such as those caused by certain medications or dental work, may not respond as effectively to whitening treatments. Your dentist can help you determine the best course of action to achieve a more uniform result.
When to Contact Your Dentist
While Zoom at-home whitening is generally safe and effective, it’s important to know when to contact your dentist. If you experience severe tooth sensitivity, persistent gum irritation, or any other unusual side effects, contact your dentist immediately. If you have concerns about the progress of your whitening treatment, or if you notice any changes in your teeth or gums, it’s important to seek professional advice. Your dentist can assess your condition and provide guidance on how to proceed. Regular dental check-ups are essential to monitor your oral health and ensure the success of your whitening treatment. Never hesitate to contact your dentist if you have any questions or concerns.
Zoom at-home whitening is a powerful and convenient method for achieving a brighter, more confident smile. By following these instructions and consulting with your dentist, you can safely and effectively whiten your teeth in the comfort of your home. Remember to practice good oral hygiene, maintain a balanced diet, and schedule regular dental check-ups to keep your smile looking its best. With proper care and attention, you can enjoy the benefits of a dazzling white smile for years to come. Take the first step towards a brighter smile today. The results can be truly transformative, enhancing both your appearance and your self-esteem.